


In the not too distant past, Nextmv released a brand new set of developer tools for building and publishing custom decision models that we collectively call the Nextmv platform. There’s a command line interface (CLI) tool for managing the overall workflow, a new software development kit (SDK) for modeling and optimization, and a cloud service and user interface for managing the production deployment of your custom decision models.
But this post is not about that. It’s about how we built our new Docs site to support the Nextmv platform rollout and customer experience with a developer-first local setup and a brand new way to manage the code referenced in the documentation. Rather than copying and pasting 1000s of lines of code into all of our markdown files, using Next.js to power the site, Markdoc to manage the markdown, and Yarn Workspaces to manage different environment (plus a little Node.js), we set up a system that allows authors to reference code files in a completely separate environment with a custom defined Markdoc tag which then is replaced with the actual code as a code snippet when the site is built.
The result is markdown content like this:
Produces output like this:
The rest of this post outlines how we built this. There’s also a companion GitHub repository that has all of the code referenced in this blog post and more. You can clone that repository and run it locally to see a demo of everything referenced below.
Setting up Next.js & Markdoc
Next.js and Markdoc were installed in their own workspace for the main Docs site. In this workspace two top-level directories src and content were created to separate the two concerns of writing and rendering: content holds all of the markdown files (the site content) and src contains all of the code needed to turn the markdown files into a website.
Next.js has a handy way to collect a set of markdown files and render them as web pages using a dynamic catch-all route with two built-in functions getStaticPaths() and getStaticProps(). Together, these two functions provide a way to convert the markdown files in the content directory to URL slugs that render the markdown content as HTML. These functions also run server-side so you have access to Node.js and can manipulate the file content as needed (in our case the markdown files).
Rendering markdown content
To render pages, a [...slug].tsx file was created as a dynamic catch-all route to render any markdown file in content as a page. This file uses Next.js’s getStaticPaths() to collect the files in the content directory as page paths and then pass them to getStaticProps() to parse the file content and pre-render as pages using the file’s default component.
In [...slug].tsx, the code for getStaticPaths() looks like this:
The getAllFiles() function recursively searches a given directory and collects all the files as paths. These paths are then cleaned up, converted to an array and then stored as an object with the required structure of the getStaticPaths() return type:
The array values of the slug property is how Next.js will map the URL to the file content. E.g. ["path", "to", "page"] is equal to /path/to/page which will then render the content of content/path/to/page.md.
Next.js then passes the return of getStaticPaths() to getStaticProps() for processing:
First, a special not found object is set up to tell Next.js to render the 404 page if there’s no slug. Then a getFileContents() function that uses Node.js’s file system (fs) to get the contents of a file is defined¹, followed by an empty variable to hold the file content (markdownFileContent). Next, the file path is reconstructed from the slug array and a check is performed to see if the file exists.
If it exists, the contents of the file are collected and stored in our previously created variable (note that this is the raw file content so it contains the frontmatter along with the markdown). If the file doesn’t exist, the path is modified to look for an index.md file as this is the pattern that was chosen for managing directory landing pages (i.e. category/index.md is mapped to the URL /category). If the file is still not found, Next.js’s special 404 object is returned, otherwise the file contents are collected and stored in the variable markdownFileContent.
Next, Markdoc is used to convert the file contents into a generic Abstract Syntax Tree (AST). This AST is then passed through the Markdoc transformer to convert the generic AST nodes into nodes that are ready to be passed to a renderer. (We will talk more about this part in the Parsing Markdoc AST section). The frontmatter is also collected from the AST and stored in the frontmatter variable.
Finally, the collected data is returned as page props to be used in the Page component:
- frontmatter — the frontmatter from the Markdown file, in our case just title.
- slug — the page slug (just a pass-through from getStaticPaths()).
- content — the AST parsed to a renderable node tree.
In the remainder of the file we define the component to render (Page) and export it as the default (see code below).
So when taken together, [...slug].tsx pre-renders each path specified in getStaticPaths() at build time with the props passed to the Page component from getStaticProps(). This setup converts any markdown file in the content directory to a static, pre-built webpage: content/about.md renders the About page at /about, content/subdir/page.md renders /subdir/page and so forth.
You can view [...slug].tsx in GitHub to see the full file.
Creating a custom Markdoc tag
Markdoc has a concept called tags, which to quote the Markdoc site are “a syntactic extension of standard Markdown.” Markdoc has a few built-in tags that you can use when writing markdown, like the {% table %} tag for example which can be used to create richer tables than what standard markdown provides:
These are nice to have, but what makes the concept so fun is that Markdoc provides built-in methods to make your own custom tags and define the components to render them. So for example you can create a {% callout %} tag that renders a React component to give the content a notification style. You can also pass attributes from the custom tag to the component so your callout tag could render different styles depending on which attribute was specified:
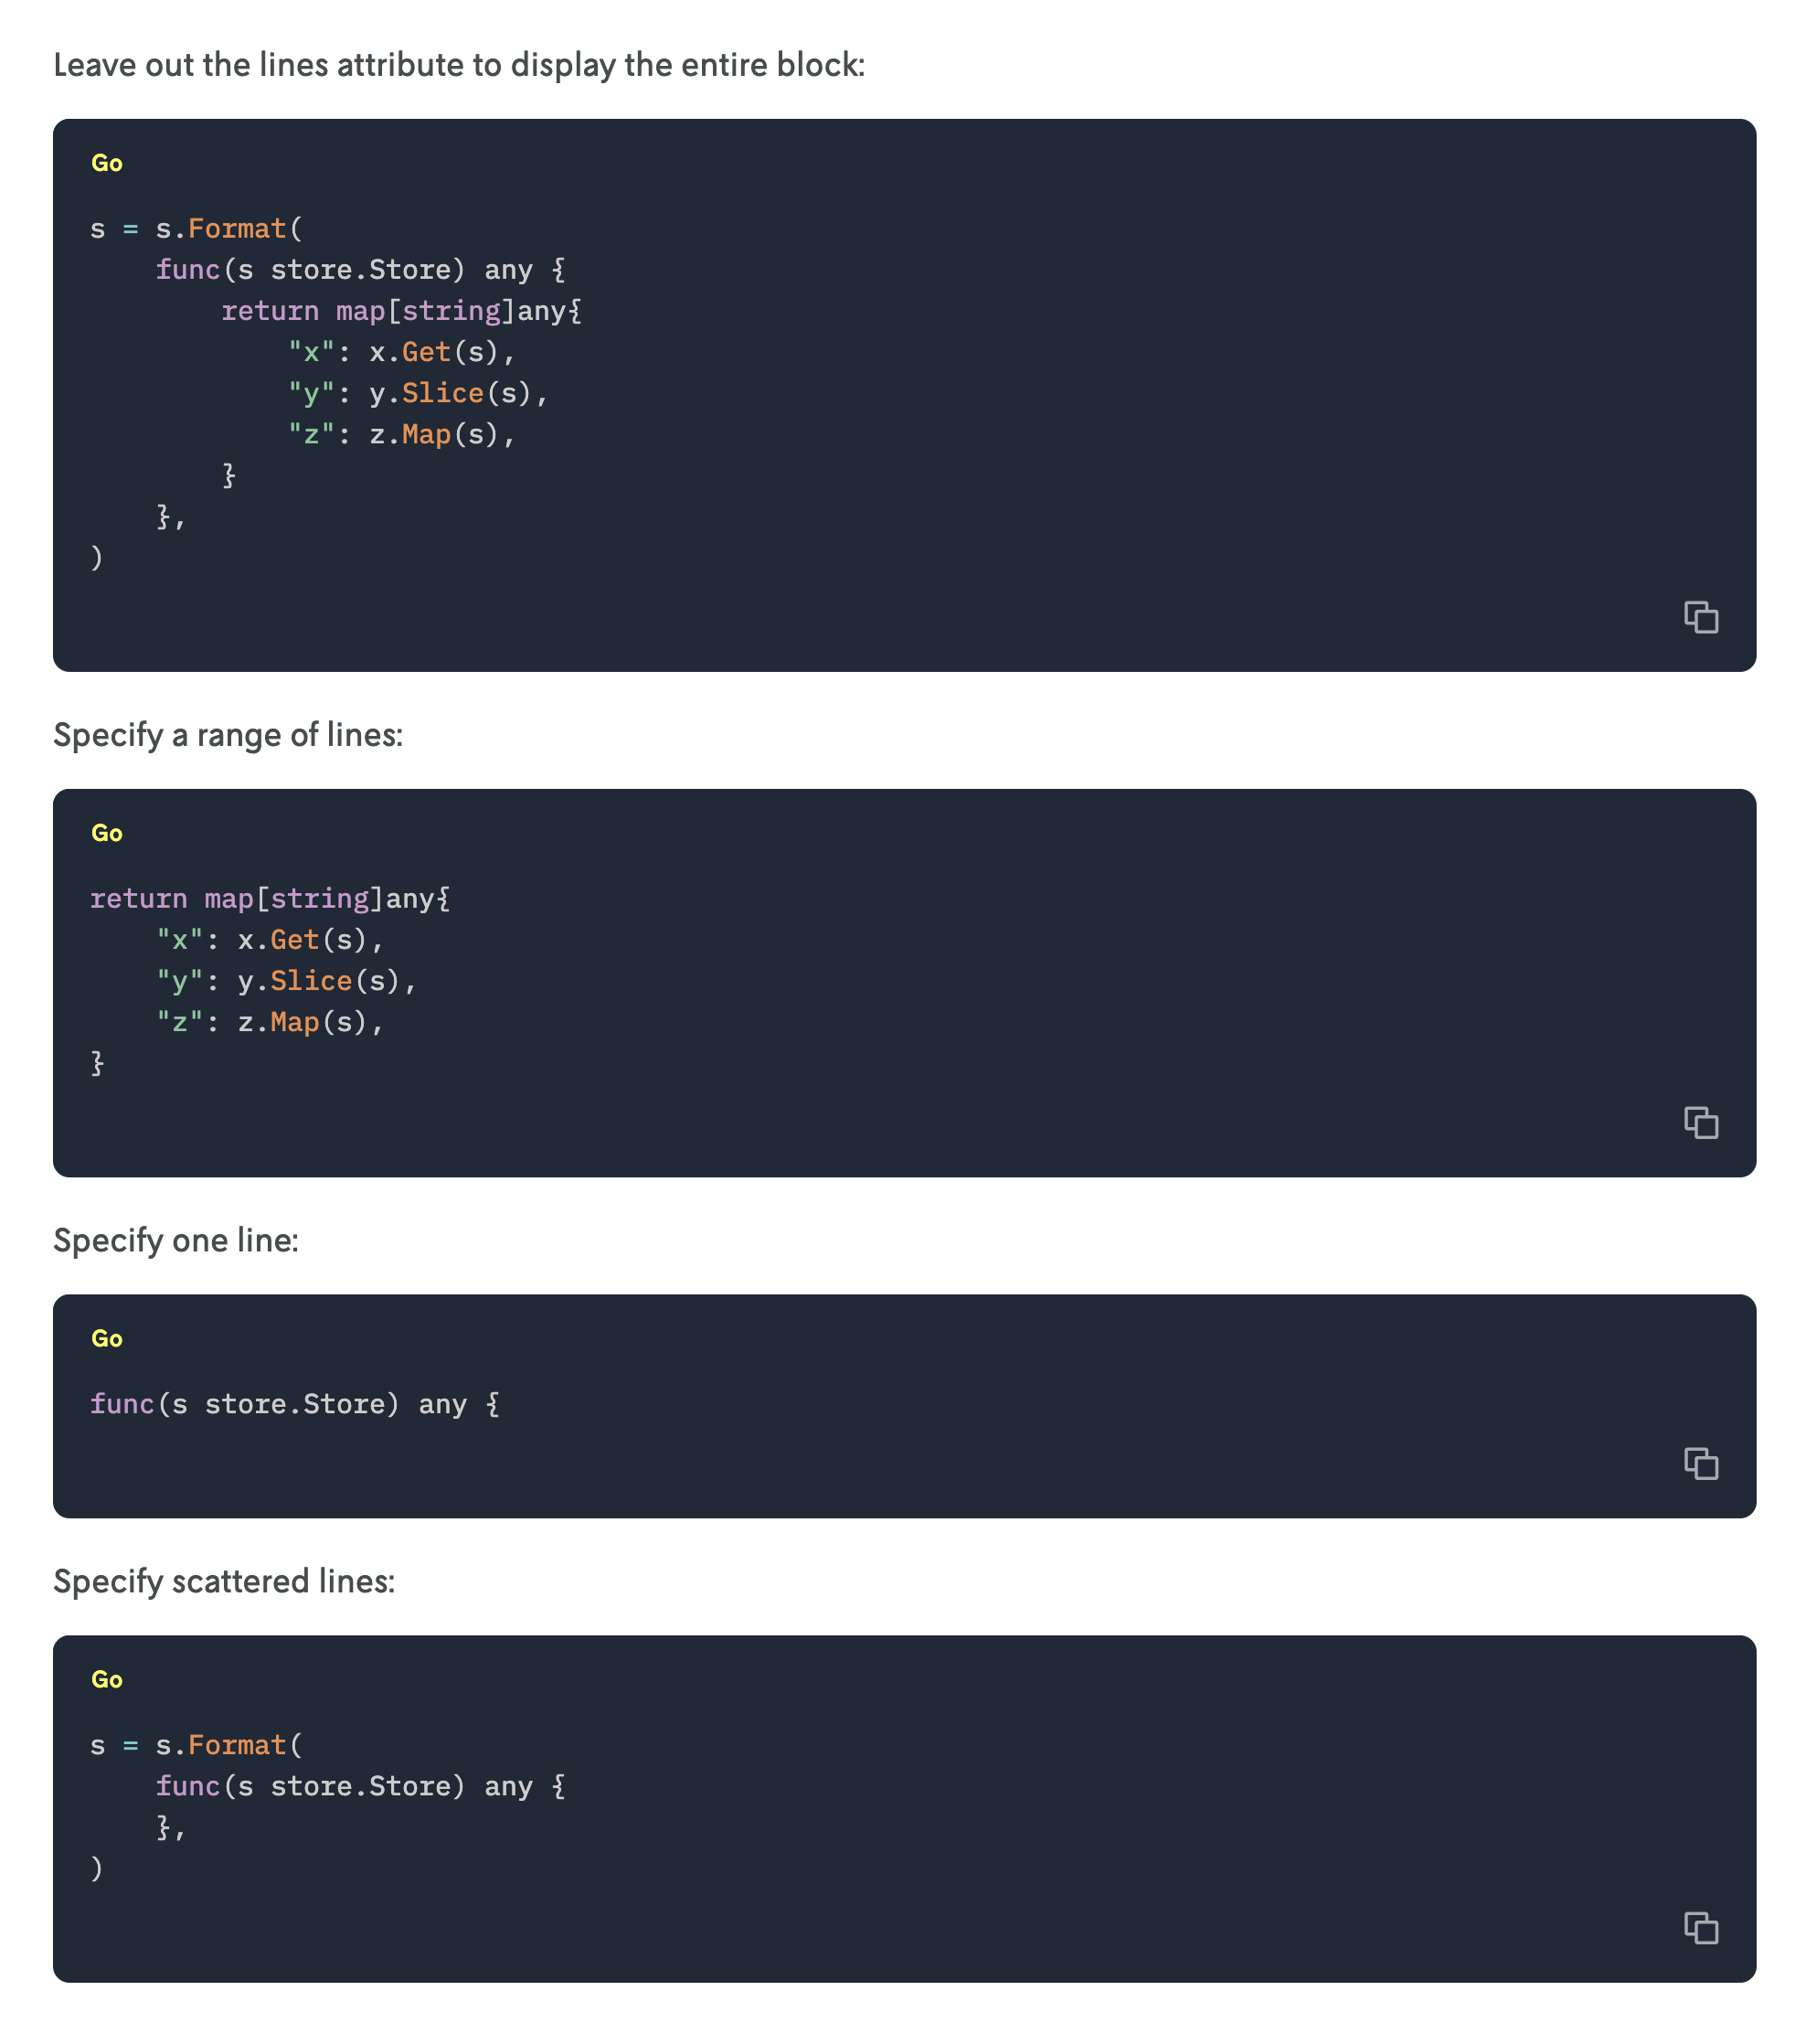
Using this mechanism, a custom tag called {% ref %} was created for content authors to reference code snippets when writing documentation. With the ref tag, you specify which file you want to display, how much of it, and which syntax highlighting to use.
This new {% ref %} tag has three possible attributes:
- path (required) — the absolute path to the file containing the code snippet.
- language (required) — the language to use for syntax highlighting.
- lines — by default, the entire contents of the file specified in the path attribute are displayed as the code snippet, however you may only want to display a few lines of the code as the snippet, so this attribute lets you specify which lines of the code file to display. If it’s absent, the tag renders the entire file contents.
The code to create this ref tag and its attributes is stored in src/schema/Ref.markdoc.js:
To make this new tag available in any markdown file we add it to the optional config parameter in the Markdoc.transform() function called in getStaticProps(). Before the code was just transforming the AST with no additional config options. Now a config object is passed that specifies the additional custom tags in the tags object where the property is the name of the tag and the value its schema definition:
Now there exists a new tag {% ref %} that is defined by schemaRef.
Then a new component CodeRef is created to use for rendering the custom tag:
Note how the custom ref tag’s attribute language is passed as a prop to the component. The other custom tag attributes path and lines are used in a separate process to obtain the code snippet, which is passed to the component here as the children prop. This separate process is covered later in the Parsing Markdoc AST section. For now, just know that children contains the code snippet.
Now that a component exists to render the code snippet, it needs to be made available to Markdoc. Like the Markdoc transform function, The Markdoc render function for React also can be given a config object. This config object has a components property which is used to specify which components should be rendered for which tags.
If you recall the schema for the ref tag above, CodeRef is the name assigned to the render property. To make a match with the Markdoc renderer, CodeRef must be specified as a property in the components object, and the component to be rendered specified as the value. In this case both are the same so the shorthand CodeRef is used (equivalent to CodeRef: CodeRef).
Revising the renderer function in the exported Page component from above, it’s now given a config object that specifies which component to use for ref when the transformed markdown is rendered:
This completes the configuration of the custom {% ref %} Markdoc tag:
- its schema was defined in Ref.markdoc.js;
- in this schema we specified CodeRef as the component to render its contents;
- the tag name was created via the tags object config passed to the Markdoc transform function; and
- the CodeRef component was passed to the Markdoc render function Markdoc.renderers.react() and connected to the custom tag with the components object.
Writing markdown
Because of our setup above, whenever a {% ref %} block is encountered in the markdown content, Markdoc knows to render that block using the CodeRef component. The attributes that are defined in the {% ref %} block are passed as props to the CodeRef component which can then render them however it wants to.
However, Markdoc does not know anything about the referenced code. It just has a file path and some other attributes.
To display the code rather than the file path, we must intercept the ref nodes before they are sent to be transformed and rendered, and insert the actual code that is being referenced. We will do this using Node.js.
In the example above, note how the file references are prefixed with @docs/code — this path prefix is a yarn workspace alias that points to a separate package in the mono repo. All of the code samples exist in their own workspace so that they can run language-specific testing frameworks and processes.
Parsing Markdoc AST to replace the file reference with code
Using this custom ref tag for code snippets also meant that when Markdoc parsed the markdown to an Abstract Syntax Tree (AST), the nodes from the ref tag were easily identifiable. We could then edit the ref nodes’ structure and content before passing them to Markdoc’s transformer and renderer. Essentially this allows us to reference a file in a completely separate environment and then at build time replace the file reference with the actual code contents.
To get from a markdown file to a rendered webpage, Markdoc does three things:
- Converts raw markdown file content to an AST (Markdoc.parse())
- Parses the AST to markdown content nodes (Markdoc.transform())
- Rendered the markdown content nodes to React components & HTML (Markdoc.renderers.react())
To replace the path reference with the actual code, we need to intercept the AST between step 1 and step 2. And again because we are using the ref tag for our code references, all of the relevant nodes will be marked with a reference tag in the schema which makes the nodes straight-forward to intercept.
If we go back to the [...slug].tsx file, we are converting the raw file contents of the markdown file to an AST here:
Before we move to the next step of transforming the AST to markdown content nodes, we will loop through the AST, find the ref nodes and insert the code they reference as part of the AST. The code to do this is below:
First, we only want the nodes that represent the {% ref %} blocks. Then we pull out the language and lines attribute to use later, and then pass the full node to a function that extracts the code reference path. If no path is present (a user error likely) then we return without modifying anything.
If the file path does exist, we check to make sure the path is valid (i.e. there’s an actual file located at the path specified), read the contents with Node.js and then pass the file contents along with the lines attribute to the getCodeSample() function to get the exact snippet of code. The getCodeSample() function has some formatting conditionals to return the properly spaced code snippet, and then this snippet of code along with the specified language is passed to the createNewFenceNode() function to create a new AST node.
The AST node created in createNewFenceNode() is defined as a fence node which is one of Markdoc’s built-in nodes and is specifically for blocks of code:
In the code snippet above, fence is the node type and the object in the second argument is the new node’s attributes. This returned AST node is then inserted as a child node of the existing ref node. (View the full contents of the getCodeSample() and createNewFenceNode() functions in the codeRef.ts file on GitHub.)
Because {% ref %} is a self-closing block, it has no child nodes by default. Which means that before we added our forEach() loop, when the ref block was rendered with the CodeRef component, the children prop was undefined. However, since we have inserted our new AST node into the ref node’s children property, the children prop of the CodeRef component will now contain our code sample.
The updated nodes (now including our transformed ref nodes) are then parsed in the Markdoc.transform() function and passed as the content prop to the exported Page component.
Conclusion
With these methods in place, code samples are now referenced from external files rather than copied and pasted into the markdown file. Not only does this help with avoiding copy and pasting errors, it makes it easier to manage code updates over time and allows for separate testing processes to be run to ensure all of the code referenced is valid code.
Footnotes
- Note that all of the Node.js functionality must be contained within the getStaticProps function as it operates on the Server.


